On This Page
- 9 min read
Your Fall Gutter Maintenance Checklist (South Carolina Edition)
First cool snap and Ashley River thunderheads rumble in. Under the live oaks, gutters choke on leaves and longleaf needles—and overflow finds fascia fast. We’ve got you covered with a Charleston fall gutter plan built for Lowcountry storm season. Follow our 9-step checklist, know what to DIY, get a free gutter check and photo report in Charleston and Mount Pleasant. Why fall hits harder in South Carolina? Let’s start there.
Why Fall Gutter Care Matters in the Lowcountry
Those red flags pop up in fall for a reason. Our hurricane and nor’easter window hits August through October, bringing bursty, sideways downpours that overwhelm small clogs. Live oaks shed tassels and leaves that mat together, while longleaf pine needles stitch through many guards and create dams. Add sticky humidity and warm snaps that keep algae slick on gutters and soffits, and water starts to wander. On flat Lowcountry lots, runoff has nowhere to go; crawlspaces trap moisture fast. Historic rooflines and two-story runs compound the load. Result: minor debris turns into overflow, leaks, and rot before you notice.
Here’s how that mix of storms, trees, humidity, and flat yards turns into real risks:
- Overflow during heavy autumn rains leading to fascia/siding damage
- Water pooling near foundations on flat Lowcountry lots
- Crawlspace humidity spikes and mildew odors after storms
- Erosion lines in beds beneath roof edges
- Pest pathways from overhanging limbs to roof and gutters
The Fall Gutter Problems We See Across Charleston
We see the same pattern every September in Mount Pleasant and James Island: oak leaf mats blanket outlets, and pine needles lace straight through screens. In West Ashley and North Charleston, elbows (the bends in your downspouts) pack with shingle grit, and hidden hangers loosen under the weight. Pitch drifts, water stalls at joints, and seams start weeping. On two-story runs, one stubborn elbow can back up an entire side of the house. You won’t always spot it from the ground. You’ll hear a soft drip hours after rain—or find a ceiling stain a week later. Waiting until winter only makes fixes cost more.
Before damage shows up, you’ll notice small tells like these—easy to miss, but they’re early warnings:
- Tiger-striping stains on gutter faces
- Mulch washed out under roof edges after storms
- Mild musty smell in crawlspace within 24–48 hours of rain
- Splashed dirt on lower siding near downspouts
- A faint drip seam at gutter joints hours after rain stops
Why Putting Off Fall Gutter Work Gets Expensive Here
That faint drip after the rain? It’s your warning light. Left alone, it saturates fascia (the board behind your gutter), bubbles paint, and invites soffit rot. Then the mosquitoes find the standing water, your dehumidifier runs overtime, and crawlspace humidity spikes. Charleston’s early-winter fronts bring long, soaking rain that exposes every weak joint, hanger, and seam you meant to fix. One clogged downspout can back up an entire run and dump water where your siding and framing are most vulnerable. Small drip. Big mess.
Waiting turns a one-hour tune-up into layered repairs. The paint crew fixes streaks, then the carpenter replaces soft spots, then you’re calling a crawlspace company to tame moisture. Meanwhile, every fall storm stacks more water on the problem. For perspective: one inch of rain on a 1,500-square-foot roof is roughly 935 gallons. If the outlet is clogged, that water looks for a wall, a slab, or a crawlspace. A preventive clean and reseal now costs less than chasing damage later—and it actually protects your roof, foundation, concrete, and fences.
Your South Carolina Fall Gutter Maintenance Checklist
Most Charleston homes can knock this out in a weekend if you’re safe and methodical. Work on a dry day, ideally 24–48 hours after rain so debris releases cleanly. If your home is two stories, your roof is steep, or power lines cross the service drop (the cable feeding your house), call us—ladder falls aren’t worth it. We’ll flag when a repair beats replacement and send photos so you can see exactly what we fixed.
Follow these steps in order, then watch a real storm to confirm everything flows. Keep notes. If anything feels unsafe or unclear, stop and book a pro visit.
- Step 1: Gear up safely: gloves, eye protection, non-slip shoes, and a stable ladder with a spotter.
- Step 2: Dry-day debris clear: scoop leaves and pine needles by hand, then bag everything immediately.
- Step 3: Flush the channels: hose from opposite ends to reveal hidden clogs and check for leaks.
- Step 4: Clear the downspouts: disconnect elbows, then snake or back-flush until flow is full.
- Step 5: Check pitch and secure: re-slope minor sags with hidden hangers and tighten loose fasteners.
- Step 6: Seal and reseat joints: clean and dry seams, then apply polyurethane or butyl gutter sealant.
- Step 7: Extend discharge: add 4–6 ft extensions or splash blocks to direct water away from foundation.
- Step 8: Trim overhangs: prune limbs 6–10 ft from the roofline and remove dead wood.
- Step 9: Test in real rain: watch the next storm and note any overflow paths.
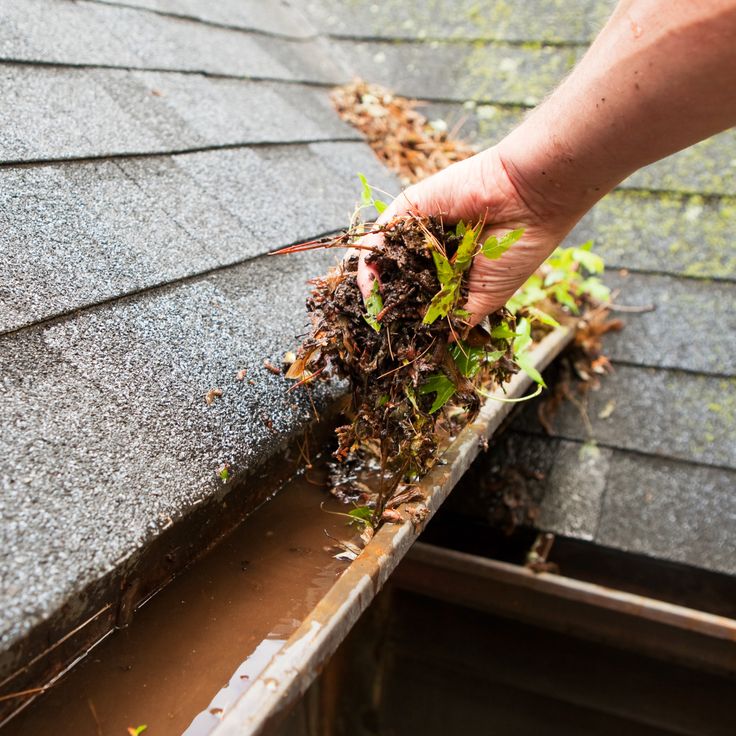
Clean out debris the Lowcountry way
Live oak leaves form mats; skim them by hand with a scoop, then brush guards lightly. Longleaf pine needles thread through screens; use a soft-bristle brush on micro-mesh (fine stainless-steel screens) to lift them off. Skip pressure washers—they bend aluminum, blow out sealant, and force water behind fascia. A garden hose with a spray nozzle is plenty.
A few best practices keep you faster and cleaner without re-clogging what you just cleared.
- Start near outlets so loosened debris doesn’t re-clog
- Bag debris to prevent it blowing back in coastal winds
- Rinse lightly to confirm flow without flooding seams
Dial in pitch and fasteners
Standing water in the trough after a dry day points to poor pitch. Re-seat sections into solid fascia (the board behind the gutter), not soft wood. Replace corroded spikes or screws before they snap during storms. Stainless or coated fasteners hold up best in our salt air.
Use this quick checklist to make sure water moves the right way before the next front arrives.
- Look for 1/16–1/8 inch fall per foot toward outlets
- Replace loose spikes with hidden hangers where feasible
- Mark and rehang sagging sections to restore slope
Downspouts that actually move water
Charleston downpours arrive in bursts, so downspouts must stay clear and secured. Pop off the lower elbow and clean out shingle grit. Tighten straps against the wall, then add 4–6 ft extensions to a safe discharge path that doesn’t soak foundations, patios, or fence lines. If elbows crush easily, replace them.
These must-dos keep water moving during sideways rain and protect the areas that fail first.
- Verify secure straps and correct angle at termination
- Add splash blocks or temporary downspout extenders
- Consider larger outlets if clogs are frequent
Trim back overhanging branches
Trimming reduces debris loads, cuts off pest bridges, and lowers limb-fall risk in nor’easters. Keep small cuts yourself, but hire a licensed arborist for large limbs, anything near service drops (the electrical line to your home), or if you’re unsure about weight and tension. Safety beats speed.
Follow these quick guidelines to protect your roof and keep gutters flowing between cleanings.
- Maintain 6–10 ft clearance from roof edges
- Remove dead or cracked limbs before fall fronts
- Disinfect tools when cutting diseased branches
Spot water damage early
After back-to-back storms, walk the perimeter. Look under gutter lines for fresh streaks, check fascia for softness, and scan siding for splatter marks. Peek into the crawlspace for musty air or damp soil. Early signs let us fix a joint today instead of replacing materials next month.
Right after a rain event, check these spots before the sun bakes away the evidence.
- Fresh stains or peeling paint under gutter lines
- Soft spots at fascia near joints/hangers
- Musty odor or moisture sensor alerts in crawlspace
A South Carolina Fall Timeline for Gutter Care
You’ve got the ladder safety handled—good. Now let’s map September through December so storms taper and leaf drop peaks don’t catch you off guard. For example, hose-test outlets in September, then tighten hangers and reseal miters in October.
| Month | Typical Weather Pattern | Priority Tasks | Time to Budget | Pro Tip |
|---|---|---|---|---|
| September | Late-summer storms; early leaf shed | Safety check, first debris clear, hose-test flush | 2–3 hours | Start before busy fall weekends |
| October | Peak leaf/needle drop | Full clean; adjust pitch; tighten hangers; reseal miters | 3–4 hours | Install extensions while soil is dry |
| November | Soaking fall fronts | Downspout deep clean; seal joints; verify guard shedding | 2–3 hours | Watch one storm to confirm full flow |
| December | Cooler, fewer leaves | Touch-up clean; trim limbs; photo document condition | 1–2 hours | Quick re-check to prep for winter rains |
Prefer a set-and-forget schedule? Our gutter maintenance plan keeps you ahead with tune-ups and photos. Want proof it works? A quick Mount Pleasant before-and-after is next.
Charleston Vignette: A One-Weekend Fix That Paid Off
Here’s that quick Mount Pleasant before-and-after we mentioned. A family off Rifle Range kept getting patio waterfalls and a musty crawlspace after every nor’easter. We spent a dry Saturday clearing oak mats, scooping the troughs, and hose-testing. The lower downspout elbow was packed with shingle grit; we popped it off and snaked it clean. Then we snapped on a 6-ft extension to push discharge past the patio and fence line. Sunday’s storm was the test. No pooling at the slab, and the crawlspace odor was gone within a day.
Here’s what changed afterward—and next we’ll show the tools and safety that made it easy.
- Even flow at outlets during heavy bursts
- No mulch blowouts along the beds
- Lower crawlspace humidity readings after rain
The Right Tools—and Safe Habits—for Fall Gutter Work
Those lower crawlspace humidity readings after rain weren’t luck—they came from simple tools used safely. Here’s what we recommend most homeowners keep handy or pick up locally.
- Tool: Ladder stabilizer — Protects gutters and shingles; widens contact for steadier footing on uneven Lowcountry soil.
- Tool: Gutter scoop — Lifts compacted oak mats and pine needles fast without gouging aluminum.
- Tool: Work gloves & eye protection — Block sharp shingle grit, hidden twigs, and surprise wasps.
- Tool: Garden hose with spray nozzle — Test downspout flow and gently rinse seams after debris removal.
- Tool: Utility bucket/bags — Bag debris immediately so coastal gusts don’t blow it back into gutters.
- Tool: Pruning saw & loppers — Make clean cuts on small limbs; leave heavy or tensioned branches.
Gear helps, but habits keep you safe. Before you climb, run this checklist every time—especially on two-story lines and after windy fronts.
- Use a spotter; keep three points of contact
- Never work on wet or windy roofs
- Place ladder on level, solid ground away from doors
- Keep kids and pets clear of the work area
Repair or Replace? How to Decide in Charleston
Once the ladder’s safe and the kids and pets are inside, the next call is repair or replace. In Charleston, replacement is smart when gutters still overflow after a thorough cleaning and hose test, seams keep weeping, or salt air has rusted through steel or corroded aluminum. Undersized 5-inch runs on steep or large roofs, widespread pulling from fascia (the board behind the gutter), and chronic seam failures are also triggers. If issues are isolated—one leak, a few loose hangers—we’ll tune up, correct pitch, and add micro-mesh guards.
See our gutter installation Charleston SC page for 6-inch K-style, half-round, micro-mesh guards, and drainage tie-ins.
Beyond the Gutters: Keep Water Moving Away
Remember those drainage tie-ins? Here are quick, yard-friendly add-ons that steer water away without digging up your yard in Charleston storms. Next: local Charleston rules.
- Add splash blocks or downspout extenders (4–6 ft)
- Direct outlets to gravel swales or flower beds, not walkways
- Regrade small low spots so water sheds from the house
- Consider leaf diverters or larger outlet funnels at trouble spots
Charleston Notes: Trees, HOAs, and Stormwater
Before you add leaf diverters or larger outlet funnels, check the local rules. Many HOAs (homeowners associations) and the City of Charleston’s Historic guidelines control gutter profiles, colors, and any drainage changes visible from the street. Get written approval if you’re switching to half-round on a front elevation or tying downspouts to pop‑up emitters. Stormwater basics: don’t discharge across sidewalks, alleys, or a neighbor’s yard; send flow to lawn or beds 4–10 feet from the foundation. On trees, live oaks and longleaf pines shed year‑round; if limbs are large or near the electrical service drop (the line feeding your home), hire an insured arborist. When in doubt, ask—we’ll help you stay compliant.
Ready for the Next Storm? Book Your Fall Gutter Tune‑Up
If you’re unsure about HOA or Historic rules, we’ll help you stay compliant—and get your gutters storm‑ready. Book a no-pressure inspection and clean‑and‑tune in Mount Pleasant, West Ashley, James Island, North Charleston, or Summerville. Most visits take about an hour, we send a photo report, and we can price guard installs or drainage tie‑ins on the spot. Fall fills fast—grab a slot now and we’ll prioritize you after major storms.
Get Expert Help
Let’s plan your fall gutter tune-up